
When you first think about it, showers seem like a very ordinary part of our daily lives. However, when you have to go a day or two without it, you easily realize how important a good shower is to rejuvenate your mind! Its manufacturer should also be a reputable one like Moen to ensure the best quality.
A major factor impacting your bathing experience is the flow of water through these shower heads. Its flow restrictor might be preventing you from having a truly fulfilling shower! So let’s take a look at how to remove flow restrictor from Moen handheld shower head!
When To Remove A Flow Restrictor From Shower Heads?
A flow restrictor is often included in shower heads in order to lower the utility expense for water and energy. However, for those of you who are not bothered about their utility budgets, it may be time for you to start enjoying heavy showers every day!
While the intention behind flow restrictors is good, it can significantly bring down your bathing experience. Since its job is to reduce the flow of water, you have to try harder than usual to get drenched enough.
So if you are not satisfied with the water flow and have no problem with slightly higher utility bills, you can consider removing the flow restrictor from your shower head.
Preparation Before Removing The Flow Restrictor
1. Get The Required Tools
First and foremost, you should gather all the items required for removing the flow restrictor which include:
- A piece of soft cloth
- Wrench
- Screwdriver
- Plumber tape
The soft cloth will help you to hold the shower head. The wrench will also contribute to this step while helping you to hold the connector pipe. It should be lightweight and adjustable so that you can hold on to the shower head tightly without feeling uncomfortable.
For similar reasons, the top of your screwdriver needs to be adjustable so that it can fix the flathead properly. Some plumber tape would be helpful in this task since it can keep the threads from collapsing later.
2. Stop The Shower Tap
This is kind of a no-brainer but you should definitely check if the shower tap is turned off completely before removing the flow restrictor. Since you will be removing some of its vital parts in order to complete the necessary removal, they should not have any water still flowing through them.
3. Four Hands Are Better Than Two
If possible, tell one of your friends or family members to stand by before starting to follow the steps briefly discussed below. Having another person present there will help you to manage the process better since he can take care of the tools or parts while you are continuing the steps.
Steps To Remove Flow Restrictor From Moen Handheld Shower Head
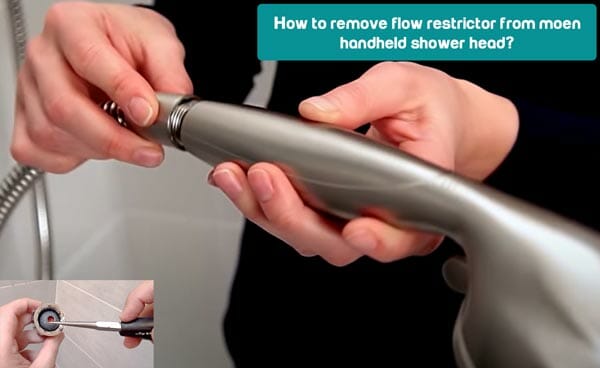
1. Remove The Shower Head
Use a soft cloth to hold the shower head and take the wrench on the other hand. Try to fixate the jaws of your wrench on this covered shower head so that you can free up the first hand. Now use it to hold the pipe present on the shower wall. Then carefully turn your wrench counterclockwise so that the head is removed.
2. Remove The O-ring Gasket
At this point, you can identify the O-ring gasket made of rubber by checking the neck of your shower head. You can remove it either by a screwdriver or manually with your fingers. The latter is more recommended since using a screwdriver may damage the gasket significantly.
Take off the screen and shake it up so that it is freshened up a little bit. Then adjust it to the removed gasket you are holding.
3. Remove The Flathead Screw
Now pay attention to the restrictor head where you can easily spot a flathead screw. Remember the adjustable screwdriver you brought? Use it now to detach the flathead screw easily and efficiently. This screwhead is usually made of plastic and comes with different perforations in it.
4. Separate The Flow Restrictor
Make use of the screwdriver again to separate the flow restrictor from your shower head. This is a step which requires complete concentration from you since it involves the many minuscule threads present inside the restrictor. Turning your screwdriver too fast may result in damages. So you need to take it slow.
5. Insert Screen And Gasket
Although the gasket screen should be clear by now, you should double check on it and make sure that it is clean enough. Then insert it back to the shower head exactly how it was before you removed the flow restrictor. Otherwise, the waterflow may still be stagnant or worse than before.
Similarly, insert the O-ring gasket and check if it is in proper alignment with the screen to ensure proper flow.
6. Put Back The Shower Head
Apply the plumber tape to cover the entire thread area of your shower arm. Now carefully place the Moen handheld shower head back to its place just like it was in the beginning. Beware of the threads since a moment of inattentiveness can result in some cuts or deeper injuries.
7. Thread The Pipe With The Connection
Remember the soft cloth you used at the very start of all these? Now take it again to hold the connection or valve tightly. Then take the shower pipe to thread it with the connection. It should not be more than three quarters.
Besides, the wrench needs to be held a little loose so that the connector or the shower head doesn’t break down.
Final Words
Although it seems a bit intimidating at first, learning how to remove flow restrictor from Moen handheld shower head is actually quite easy!
Even if you screw up at first, you will definitely get a hang of it with a bit of practice and then can help others to learn the same! Be careful to not cause any injury on yourself or others.
Also Read:
SeaRanchLodge.com is a participant in the Amazon Associate program and will earn from qualifying purchases.